Cherry Hau

Creating complex mechanical rigs ready for use in NPR animation
The reason for the work undertaken during this project was to improve my skills and workflow in animation, and to prepare rigs and practices for next year’s major project.
The main outcome for this was the rigs created for characters and interactable instruments, as well as new working practices. However, I also have some test animation footage which is embedded above.
The brief for this project was to improve my skills and workflow in animation, and to prepare rigs and workling practices for next year’s major project.
In this article I will discuss some of the points of interest, and new skills that I have learnt.
A lot of the work here is building off of my previous NPR project of chibi characters, which you can view here.
This project was formed of multiple small test pieces, and was more focussed on developing my workflow; as a result, there was not one specific time sheet.
Rigging, topology, and materials, amongst others have been elements which I have repeatedly come back to, and are going to be continuously modified and improved.
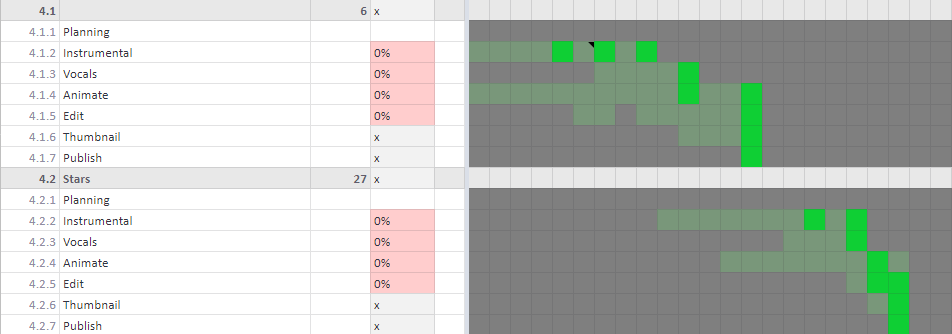
Each small test did have its own time sheet 1.2.1, where they were broken down into smaller tasks, and each clip followed a similar process. 4.1 and 4.2 are duplicates because I was trying to see if I could work on two overlapping but staggered projects; this ended up being possible, but not reasonable alongside other ongoing commitments.
Managing assets for a larger project can get extremely complicated very quickly. With a detailed character, props, scenery, and their rigs, a file can quickly become overloaded and slow to work on if they are all kept together.
Being able to modify assets individually and have them update across multiple projects makes it a lot easier to upgrade models; having the scene separate lessens distractions whilst keeping program performance high, and reduces the chance of accidentally editing the wrong object.
I developed my workflow to have all modelling of assets as separate from animation and scene setup as possible.

Having each asset separated into different files makes it easy to jump into editing exactly what I want to be working on, without having to worry about bringing in the updated asset into the final scene.
Keeping many separate files does mean that I have to be careful with file paths when linking assets, since moving files to different locations can break the link between them. My folder tree can be seen in 2.1.1.
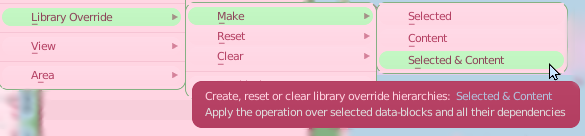
When animating, however, I need to be able to modify the animation data in the rig. The program provides for this; it is possible to create a library override for linked assets which allows for posing and animating rigs without overriding the linked mesh data 2.1.2.
I have done some experiments in how modifications to overridden rigs are carried across, but it is difficult to control so many variables; I intend to continue trying to work this out and streamline my workflow further.
IK and emotion controllers have been covered before in the Chibi Characters Project writeup. This section will outline some additional developments built on the same principles.
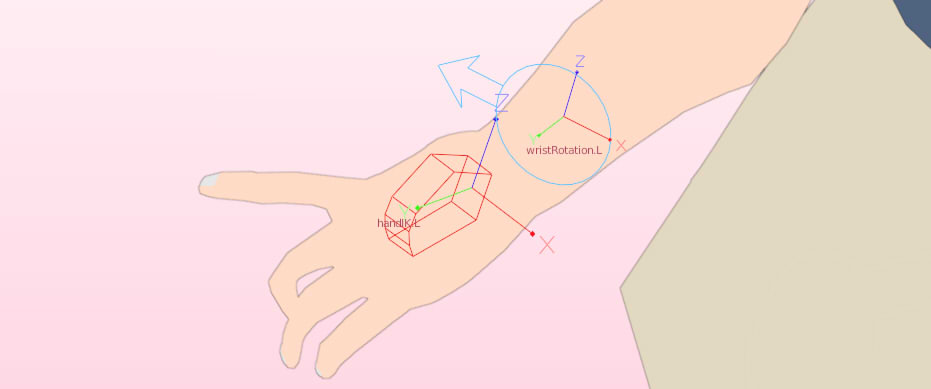
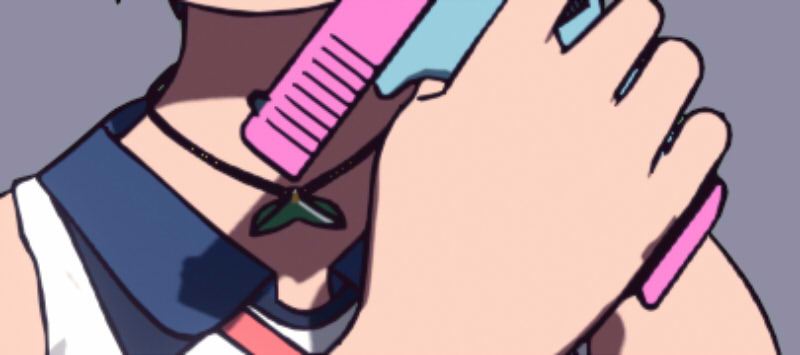
We begin this section with simplifying common movements. Certain motions may seem simplistic, such as twisting your wrist. However, this involves twisting through the forearm if the motion is to appear smooth 2.2.1.
This is not a weight painting problem; painting greater influence for the wrist or hand up the forearm towards the elbow would cause the arm to bend as the hand is posed, which should not be possible.
Instead, creating a separate wrist bone dedicated to only controlling twist of the forearm 2.2.2 makes sure that no other unwanted deformations can occur.
Whilst this fixes the visual issue, it is unintuitive for the animator to have to adjust multiple bones to achieve what could be seen as a single posing motion – twisting the wrist. Bone constraints are perfect for this role, enabling the automation of the forearm twisting bone as the hand is posed.
This acts like the opposite of a control bone – the animator has no need to interact with it, and it is detached from the main skeleton.
The use of additional untouched bones like this speeds up animation, since the animator can pose the character using the IK bones without having to worry about fixing twisting artifacts separately 2.2.3.
My first frolic into the world of mixing separate bones, constraints, and drivers – the emotion and speech facial controller has been updated 2.2.4.
This was when I began using separated control bones to help the animator, mixed with constraints and drivers to make animation and posing as intuitive and straightforward as possible. This led to the newer developments below.
Rigging is useful for anything that needs to be posed or animated, whether a character, or a moving prop.
In a similar way, these rigs can be set up with constraints and controls to speed up working with them.
Here is a fully rigged setup for a microphone stand, making use of some inverse kinematics to position and rotate the microphone, automatically adjusting the telescopic arm and off-axis boom rotation to position the microphone in the exact position specified 2.3.1.
Manual control is given to adjusting the microphone shock mount, but the microphone will rotate to face the target (the red wire microphone towards the right).
Rigging for character interaction is a topic which I could not find much about, though like with any other design problem, there are countless methods of going about it. Here, I set about combining mechanical rigging with character interaction.
In a way similar to the character expression controller, I wanted to create an interface for the animator to more easily create the expected poses and movements as the character interacts with an object – in this case, an electric piano.
The piano is rigged separately to position and pose the stand, and to animate the keys. My goal was to create another rig which would be the only one the animator would be interfacing with whilst animating the piano. This would need to include controls for finger, wrist, and hand placement, each finger’s pole target, and more controls for finger lifts and inverts 2.4.1. These would allow the animator to pose and animate any regular piano note run or chord shape.

The controllers seen in their default bone display is very difficult to understand 2.4.1. With the only defining characteristic being size, there is no real way to quickly identify what control does what.
This is where bone handles come in again; whilst they were used in the expression controller for clarity, here they are used for identification 2.4.2.

Each different bone handle showcases the function of the control, and when the character is present, there is added visual context to what does what, and which finger is being influenced. After a bit of time using it, it becomes a lot quicker to use than it would to directly animate with the character’s body rig.
Another character interface rig was made for a guitar 2.4.3. Whilst still working with the same character rig, the controls are completely different since the expected movements are not the same, and the rig is optimised for that.

Whilst these rigs provide the tools to quickly pose the character, to make natural appearing motions, it is still required for the animator to follow the principles of animation when animating motion between different shapes and poses.
Another reason for creating these self-contained interface rigs, was because I was beginning to work with non-linear animation (NLA). This is similar to how you would animate for a game, creating separate clips for specific movements and then mixing them together to produce a final animation.
This is very useful in the case of repeated movements, in this case, bars of music with repeated motifs. The NLA strip for the guitar armature can be seen in 2.5.1, with the repeated chorus patterns.

Being able to mix between different animation clips allowed me to focus on one section at a time, without having the distraction of the whole rig’s animation keyframes.
An animation clip can only exist for a single object, so keeping the animation in a single armature is easier both whilst animating, and whilst arranging NLA clips.
One thing that I found whilst creating my test clips, was that there was always something new to improve. Throughout the production of clips this included:
Whilst they are at a stage where they can be used to produce good quality animations, there is always something that could be changed to further improve the rigs, model, or my workflow, optimising it for the next project.
One area which I have changed numerous times – it has not been kept the same between any two renders – is the thumb. Whether it is adjusting the length and pivot points of bones or the topology and weight painting, it always seems to have room for improvement.
The latest change was during my latest render, where there were strange shadows being caused in a certain pose that I had not used before 2.6.1.

This led to another change of the topology 2.6.2, but provided great improvements to the look when the thumb is in this specific rotation 2.6.3.
To conclude, this project – or more accurately, these first stages of the project – have taught me a lot about managing larger animation projects and has set me up with new tools, knowledge, and improved workflows for bigger future projects.
With non-linear animation set to be a large part of my future projects, the new experience I’ve gained in working with it will be invaluable. The stages of experimentation and iteration have also fixed a lot of problems that I would have run into in the early stages of animation.
Whilst there are almost certainly going to be more problems to be solve and challenges to overcome, this experience has given me more knowledge to have a better chance at success. Everything here will be built upon in the future for new projects.