Cherry Hau

Designing, modelling and rigging a set of stylised chibi characters for animation, and using them in creating content for social media
The brief for this project was to create content as part of my social media campaign.
I decided to create a set of stylised 3D characters, since I wanted to add more character work to my portfolio, including rigging and basic animation.
This article will cover some of the interesting parts and challenges I faced whilst creating the chibi character set.
For details about my social media strategy, check out my full campaign writeup.
I ended the project with four complete, fully rigged, stylised chibi characters, with attractive renders and animations formatted for Instagram.
Here is a short video showcasing them 0.1.
This project is a branch from the social media campaign. I wanted to add stylised character work to my portfolio, and used social media to showcase them. Multiple visual content pieces were required for each character, since posting needed to maintained at a more regular rate than I was capable of creating new characters at.
Whilst researching other illustrators on social media I decided on six types of content which I could reuse for each character.
This made use of images, carousels, videos, and reels, which are all of the primary content types on Instagram. I would save WIPs and updates for stories. More information can be found in my social media strategy writeup.

I set out my timesheet broken down into small tasks 1.2.1. This made sure that I was making each piece of content in time to hit my post schedule.
I chose to use an NPR cel-shaded look inspired by other character artists on Instagram. This would allow me to experiment with custom normals, which is something I had seen being used on Twitter. The chibi style was chosen since the exaggerated but simplified details are popular on the platform, as well as potentially being easier to create content quickly.
Chibi characters’ head to body ratio usually ranged between 1:2 and 1:3, and I chose to go towards the more exaggerated 1:2. I then started sketching designs for characters and outfits 1.4.1.

My first outfit design is inspired by the University of Winchester branding, using the colours, hatched squares and logo in the design.
One of the main features of my chibi character’s are their large eyes; these are one of the main focal points of the character and are used to portray their emotions. Whilst I had created a base mesh from which I made each new character, I made sure that each would have their own eye shape 1.3.1.

That gave each of them a very different look and made sure they all felt like they had their own individual personality.
Custom normals is a method in 3D by which, similarly to using a normal map, the program reflects light rays in a different direction to that dictated by the geometry. Custom normals can only work with existing geometry rather than adding detail like normal maps. In NPR (non-photoreal rendering), this can be used to create simplified shadows 2.1.1.1.
Whilst not accurate to how a shadow would actually be cast, in anime art it is common for smoother and simpler shadows, especially across characters’ faces. This method allows this without the use of any post processing effects, and can update in real-time with in-scene lighting.
I tried two different methods to modify the normals in my character meshes.
The first is with a Blender addon created especially for this purpose, called Abnormal. This allows precise control over the normal for every vertex across a mesh. However, the extreme control also makes it a very manual process.
An alternative method is using a proxy mesh, with a Data Transfer modifier. This transfers the normals from a separate, simpler mesh which does not have to match the geometry of the target 2.1.2.1.

Benefits of this is it being quicker and more intuitive, as its easier to understand the lighting when you can see it visually. However, it is less precise and mapping from one mesh to another can create strange artifacts.
The best method for this would therefore likely be using a proxy to begin with, and then once the mesh is complete and no more changes would be needed, applying the modifier and then using Abnormal to fine tune to normals which are already close to the end goal generated from the proxy mesh.
With each character, I used different techniques to model their hair.
For the first, I used curves with a custom profile 2.2.1.1. This is similar to methods I have used in the past.

This is intuitive and creates an attractive outcome, though the generated linework can become messy 2.2.1.2 and the intersecting geometry makes this difficult to fix.

This is also a relatively high-poly method, and a lot of the geometry can not be seen. UVs are controlled by the curves and whilst can be adjusted or mapped from a proxy, this did not create a better looking result.
For the second, I modelled the hair completely using polygon modelling tools 2.2.2.1. This created a single manifold mesh for the each section, allowing me finer control of the UVs, normals, and line art.

This created a much lower poly-count, with less intersecting geometry and cleaner UVs. This method is easier to control for shorter hair styles.
I used the same technique for the fourth character, SpoonIllust’s Nekomi’s hair 2.2.2.2.

This was especially good for controlling the directional highlights on the fringe.
I split the face into vertex groups so that I could have shape keys influence the mouth, eyes, and brows separately, and assigned these to their relevant shape keys 2.3.1.1. This meant that the shape key would only influence specific parts of the mesh that I specified.
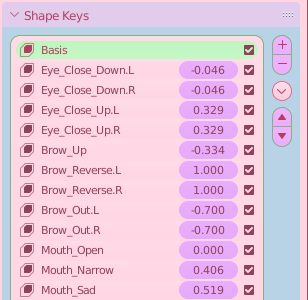
I created these with the intention of having a smaller number of shape keys that could be combined to create different expressions 2.3.1.2. For example, the shape key for narrowing the mouth combining with opening the mouth to create different vowel sounds, and allowing a negative value for wider smiles or shouting.
Once the shape keys were set up, I set about making a facial animation controller. This would use drivers to control the shape keys from a simplified rig, which would be more intuitive and mix between different shape keys mathematically 2.3.1.3.
This makes interpolation between expressions easy by moving the controllers linearly to their new location, making animating the expressions a lot easier.
For the body rig of my character, I improved almost every part from the last biped rig I had created.
Along with better inverse kinematics (IK) for the hands and feet including controls for rotating the foot around the toe and heel, I included IK for the spine, allowing me to more easily pose the torso, and adjust the shoulders and hips relative to each other.
I included additional bones for the wrist, which helped to smooth out the rotation along the forearm, removing twisting in a more elegant solution to the last where I split the forearm into three separate bones.
I doubled the elbow and knee joints to closer mimic the way the joints actually move, since they do not rotate about a fixed axis.

This helped to fix problems when the elbows and knees are bent sharply such as in 2.3.1.1.
Finally, I started experimenting with drivers for the body as well as the face. This helped to fix areas which suffered from common issues, such as twisting around the shoulder, as well as driving shape keys when bones are in specific positions or angles to correct for problems or add detail such as wrinkles or muscle.
I saw a post on Twitter talking about cloth simulation, and I decided that I wanted to try to use it to add some dynamic motion to my character.
For Cerise’ skirt, I create a low-poly mesh over the original geometry which would be used for the physics simulation. This would make it quicker since the calculation is on a simpler model, and also would reduce the chance of strange artifacts as densely populated vertices collide with each other.

I set it to display as a wireframe in the viewport 2.3.1 so that it would be easy to edit whilst being able to see the effects on the base mesh.
I enabled cloth physics with a pinning group to hold it up at the top, and collision on a low poly version of the legs.
To map the deformation onto the skirt, I used a surface deform modifier which bound the visual model to the deformation model. A big benefit of controlling the simulation from a simple proxy is that since I had modelled a double layered skirt, there would be a high probability of the layers clipping into or colliding awkwardly with each other. This problem is avoided by having both layers deform equally.
The simpler geometry for the simulation allows the deformation to be viewed in viewport in almost real time 2.3.2. I added the tails from her large bow on her back to the deformation group, and this kept it moving with the skirt.
I used the simplified mesh as a shading proxy, mapping the normals onto the visual geometry and creating smooth shadows across the skirt.
The other place I chose to use physics is on her hair; once again I created a low-poly proxy object for the simulation, but this time I added some internal pressure to the simulation to keep the volume of the hair 2.3.3.
For my first character Cerise’ skirt, I had designed in squares around the base of the skirt. This would be applied as a texture 2.4.1.
A problem with this however, is that UV stretching is very obvious with geometric shapes such as squares, and creating a texture that results in perfect squares around a bell-shaped skirt would be very difficult.
Instead, I looked for a mathematical solution. It seemed reasonable to believe that it would be possible to project a texture out in a circle from a fixed point in the XY plane, outward like a vertical cylinder.
Breaking down the problem with a messy sketch 2.4.2 showed me that I could find the coordinate in the horizontal plane using simple trigonometry. The difficult part would be to map this to the UV texture correctly around the circle, and to convert this to vector math.
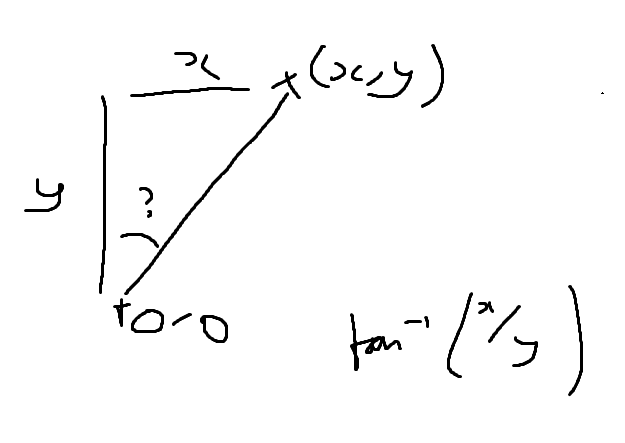
One of the initial problems was that the sign of x/y repeats; when both are negative or both are positive, the result is positive, and if their signs are different, then the result is negative. This meant that the texture would only map half way around the circle, then would repeat the same half again.
Using a sign function to apply an offset to one half of the circle gave me the result I was looking for. The texture projecting out can be seen in 2.4.3, and the complete node network for the circle projection can be seen in 2.4.4.

This allowed me to map the simple texture around the strangely shaped skirt 2.4.5. I then baked it into a new texture using a second, even UV map which would allow the texture to deform with the mesh properly.

The benefits of this are obvious in 2.4.6. The top texture is the one I had created, and mapping around the bell curve UVs was done mathematically and baked into the bottom texture.
There was no way I could have made the bottom texture from scratch, and modifying the skirt UVs to fit the first texture perfectly would also have been very difficult.

For the line art, I chose to use Blender’s freestyle, since it is the method by which a character artist I admire (rukikuri) achieves their results. However, this is a post processing effect, so it cannot be viewed in real time. Another option is the inverted hull technique, which uses a duplicate of the mesh that is larger than the original. This is how it is possible to achieve outlines in real time for use in game engines, for example.
To allow control over the generated lines I applied some modifiers to the curve 2.5.1.


The colour modifier gets a colour from the material of the geometry which I can specify, and this allows different materials to have different coloured outlines.
To make sure the whole piece did not look incoherent, I set the colour to mix with a base colour, so that they would not be too different from one another. The difference is exaggerated in the example 2.5.2, however.
The thickness is also controlled by an Along Stroke modifier, which I used to give the lines an uneven thickness which roughly mimics a pen stroke. This gives it a little bit more of a traditional feel, and looks slightly less CG without perfect outlines.
This project is the first time I properly experimented with render layers to process parts of the image separately.
These allowed me to separate parts of the scene into different render passes, so that they could be combined in post processing, and different effects can be used for each.
One particular use I found for this was for Clem’s skirt. I wanted her pleated skirt to have shadows cast in the pleats, despite my lighting setup having cast shadows disabled. I initially thought about faking it by using a shadow texture, but that would not react to the light.
Instead, I created a new render layer with a shadow catcher/caster material. This would cast shadows exclusively on the skirt, which meant that nothing else would be affected and shading artifacts would not be introduced anywhere else.
This allowed me to create aesthetically pleasing shadows for the skirt which did not affect the shading of any other part of the mesh, which also reacts to the light moving 2.6.1. I also had more control over its influence in compositing, since I could make the shadows more intense or change their colours like a separate layer in any image editing program.

I used a similar technique for Nekomi’s skirt, and the shadow cast from her apron 2.6.2. This helped give depth to that part of the image, without changing how the shadows looked anywhere else.
The Blender compositor allowed me to control each render layer with its own post processing stack.
I used this to combine them all together with a background, adding effects such as bloom and noise which helped to make the whole image look less digital, and make final colour correction adjustments.
This was my first time using the compositor, and I developed my process with each character.

The most complex composite for a static character piece was Nekomi 2.7.1, which used five render passes for foreground, background, shadows and line art.
An idea of how the composite effects the image can be seen in the layer breakdown 2.7.2, which shows how the overall look changes as new compositor nodes are added.
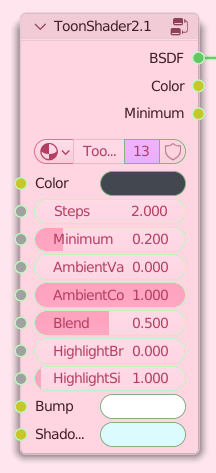
I used a modified version of the toon shader material that I had been developing for the past few years. The basic functionality is the same as in the MiMals project.
It is very versatile, allowing the user to control the influence of ambient colour and shadow, the number of shading steps from light to shadow, bump textures to blend between them, and it reacts intuitively with lights in the scene.
New features I have added include shadow colour tinting per material, which is good for imitating bounced ambient light or just adjusting colour temperature for an effect, and highlights for metallic materials 2.8.1.
For the hair material, I used a modified version of Royal Skies’s hair shader which is procedural based on wave textures distorted by noise and math.
This project was a great learning experience, and I got to experiment with facial rigging, animation, materials, custom normals, cloth simulation, and compositing.
I am very happy with the final outcome, and hope to do more character work using these skills going forward.
Keep up to date with my character content on Instagram!